eBay
To setup your eBay store with Despatch Cloud please follow the installation and setup instructions as below.
If you would like support setting up your eBay store with Despatch Cloud you can call us on 01377 455 180 or email [email protected].
If you want to know more about eBay, you can visit the official eBay website https://www.ebay.co.uk
eBay
Note: To setup an eBay account with Despatch Cloud you must have the login credentials for the eBay account you wish to setup.
To setup your eBay account follow the below steps. If you need help or have any questions please contact us.
Step 1
Step 1
Login to your Despatch Cloud account.
Click on the Settings > Sales Channels menu option from the left hand menu (as below).

Step 3
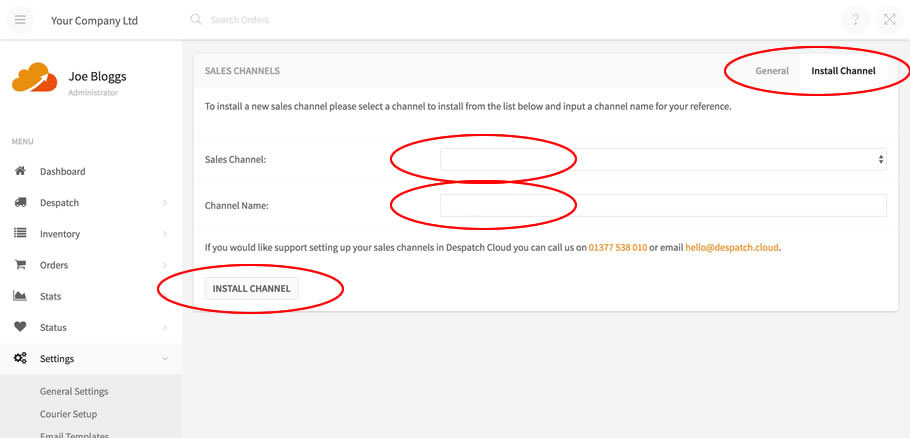
Click on Install Channel (top right) and select eBay from the sales channels dropdown menu. Input a name for the eBay account you are adding (example: eBay or the name of the eBay account on eBay) and click on the Install Channel button (as below).

You will see the new eBay sales channel auto install and a number of data fields will now show under the new channel. In order to activate this channel it needs to be connected to your eBay account. You will see two data fields for Access Token and Site ID to obtain these credentials from eBay you will need to run our eBay auto connection wizard. To run the wizard now please click on the link below:
https://despatch.cloud/connect/ebay/
Step 5
Once the eBay auto connection wizard loads you will be asked to select the eBay site your account is registered on from a dropdown menu (as below).

Step 6
You will then need to click on the Create Access Token button, this action will take you to eBay to login (as below).

Login to eBay with the login credentials for the eBay account you wish to setup (as below).

You will see a page with the title "Grant application access: Despatch Cloud" on this page click on the I Agree button to confirm you give Despatch Cloud access to your eBay account to collect orders, confirm despatch, update stock and download inventory (as below).
Note: Giving application access to Despatch Cloud does NOT allow any Despatch Cloud staff access to your eBay account.

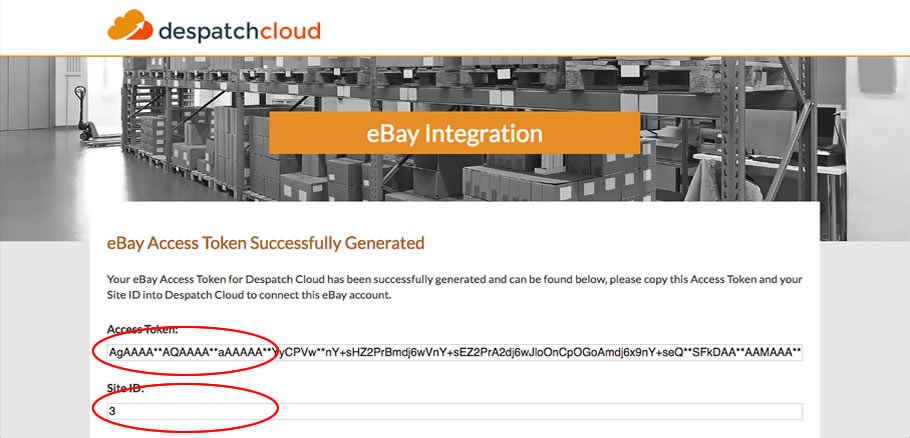
You will then be taken back to our eBay auto connection wizard and you will now see two data fields with your Access Token and Site ID provided (as below).

Copy the Access Token and Site ID into your Despatch Cloud account under the new eBay account you installed in Step 4 (as below).

Now your eBay account Access Token and Site ID are inputted into Despatch Cloud the last step is to fill out the remaining data fields for the new eBay account.
These fields are as follows:
| Field | Description |
| Active | Enable this option to activate this sales channel. |
| Sync Stock | Enable this option to synchronise stock for this channel |
| Remove Channel: | Use this option to remove the sales channel (you will not want to do this if you are currently adding it, however it worth knowing how to remove a sales channel). Note: To use this option select Yes from the dropdown, then click the Save Changes button at the bottom of the page. The Sales Channel will then be removed, however orders from this channel will NOT be. |
| Company Logo | Select the image you would like to appear on your invoice/packing sheet. |
| Company Name | Enter the company name you would like to appear on your invoice/packing sheet. |
| Company Return Address | Enter the return address you would like to appear on your invoice/packing sheet. |
| Company Reg Info | Enter the company registration number you would like to appear on your invoice/packing sheet. |
| Company Email | Enter the email address you would like to appear on your invoice/packing sheet. |
| Company Phone | Enter the company phone number you would like to appear on your invoice/packing sheet. |
| Invoice Template | Enter the invoice template you would like to use for your invoice/pacing sheet. Note: You can upload/download invoice/packing sheet templates under the Settings > Print Templates menu option from the left hand menu. |
| Name Translation | Enable this option to add the local inventory item name to the invoice/packing sheet as well as the sales channel name. (This option is very useful if your item names differ across your sales channels or if you're selling on international sales channels.) |
| Despatch Email Active | Enable this option to send an email to the customer (with tracking data if applicable) when the order is despatched. Note: Do not activate for any Amazon sales channels. |
| Email Subject | Enter the email subject how you would like it to appear to the recipient. |
| Email From | Enter the company name that you would like the recipient to see on emails. |
| Email Address | Enter the email address that you would like the recipient to receive sent emails from. |
| Email Template | Select the template you would like to use for emails sent. Note: You can create/edit email templates under the Settings > Email Templates menu option from the left hand menu. |
Step 12
Save the data you have input using the Save Changes button at the bottom of the page. You will see a green dialog at the top of the page to confirm the settings have been successfully saved (as below).

Your new eBay account is now integrated with Despatch Cloud and Despatch Cloud will now attempt to collect your despatch ready orders from your integrated eBay account. This is an automated process and runs every 30 minutes on the hour and half hour.
When you despatch an order with Despatch Cloud, Despatch Cloud will automatically update your new eBay account with the despatch data. Again this is an automated process and runs every 3 minutes, however requests are queued so at busy times this can take longer. You can view your request queue at any time under the Status > Request Queue menu option from the left hand menu.
If you would like support setting up this eBay account with Despatch Cloud you can call us on 01377 455 180 or email [email protected].