CubeCart
To setup your CubeCart store with Despatch Cloud please follow the installation and setup instructions as below.
If you would like support setting up your CubeCart store with Despatch Cloud you can call us on 01377 455 180 or email [email protected].
If you want to know more about CubeCart, you can visit the official CubeCart website https://www.cubecart.com
CubeCart 3
Unfortunately we do not currently have a how to guide for CubeCart 3, however CubeCart 3 can be added by contacting us.
CubeCart 4
Unfortunately we do not currently have a how to guide for CubeCart 4, however CubeCart 4 can be added by contacting us.
CubeCart 5
Note: To setup a CubeCart 5 store with Despatch Cloud you must have the admin login credentials and FTP credentials for the CubeCart 5 store you wish to setup.
Step 1
Login to your Despatch Cloud account.
Step 2
Click on the Settings > Sales Channels menu option from the left hand menu (as below).
Step 3
Click on Install Channel (top right) and select CubeCart 5 from the sales channels dropdown menu. Input a name for the CubeCart 5 store you are adding (example: CubeCart 5 or the name of the CubeCart 5 store) and click on the Install Channel button (as below).
Step 4
You will see the new CubeCart 5 sales channel auto install and a number of data fields will now show under the new channel. In order to activate this channel it needs to be connected to your CubeCart 5 store.
You will see two data fields for API Key and URL that you need to obtain from your CubeCart 5 store.
Step 5
To obtain your credentials from your CubeCart 5 store you will first need to install the Despatch Cloud CubeCart 5 module. This module allows Despatch Cloud to communicate with your CubeCart 5 store.
To download the CubeCart 5 Despatch Cloud module click on the link below to go to the CubeCart extensions marketplace and click on the download module link (as below),
https://www.cubecart.com/extensions/plugins/despatch-cloud-multichannel-order-stock-management-cubecart-5/6
Step 6
Unzip the downloaded module folder and upload the "despatch_cloud" folder to the following location on your website server:
ROOT/modules/affiliate/
Note: ROOT is the root of your store (the same location as your stores index.php, admin.php files etc).
Note: If you do not have an FTP client to upload the Despatch Cloud module files to your server you can download FileZilla free from the FileZilla website. If you are unsure how to upload the module files to your CubeCart 5 website please contact us in most cases we can do this for you.
Step 7
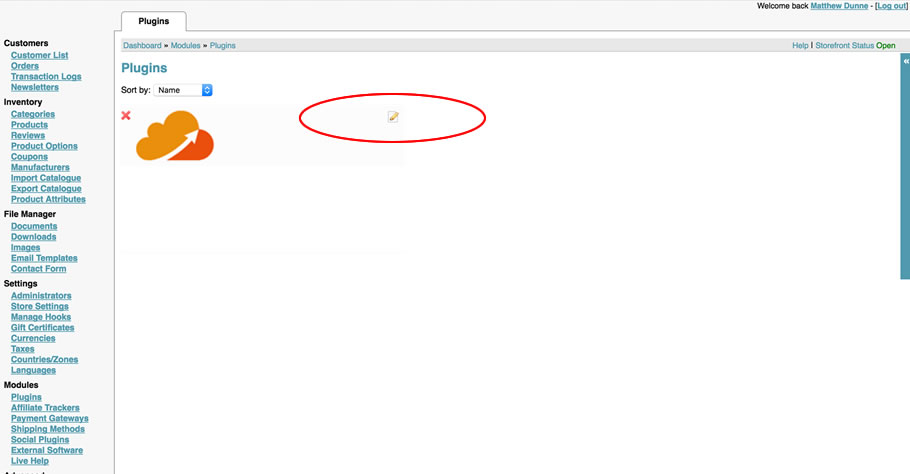
Login to your CubeCart 5 store and from the left hand menu select "Modules>Affiliate Tracking" you will then see the new Despatch Cloud module in the module list. Click on the "Configure" link to setup the module (as below).
Step 8
Set the status to "Enabled".
Set an API key. This key can be anything however we suggest you create a random password and enter this in the API key field, the key needs to be at least 24 characters long and be made up of random letters and numbers.
Note: You can use a service such as http://passwordsgenerator.net/ to create a secure random API key.
Set the default currency value (for UK stores this should be GBP).
Step 9
Save the changes using the "Save" button (as below).
Step 10
Copy the API Key and Site URL into your Despatch Cloud account under the new CubeCart 4 store you installed in Step 4 (as below).
Step 11
Now your CubeCart 5 authentication credentials are inputted into Despatch Cloud the last step is to fill out the remaining data fields for the new CubeCart 5 store.
These fields are as follows:
| Field | Description |
| Active | Enable this option to activate this sales channel. |
| Sync Stock | Enable this option to synchronise stock for this channel |
| Remove Channel: | Use this option to remove the sales channel (you will not want to do this if you are currently adding it, however it worth knowing how to remove a sales channel). Note: To use this option select Yes from the dropdown, then click the Save Changes button at the bottom of the page. The Sales Channel will then be removed, however orders from this channel will NOT be. |
| Company Logo | Select the image you would like to appear on your invoice/packing sheet. |
| Company Name | Enter the company name you would like to appear on your invoice/packing sheet. |
| Company Return Address | Enter the return address you would like to appear on your invoice/packing sheet. |
| Company Reg Info | Enter the company registration number you would like to appear on your invoice/packing sheet. |
| Company Email | Enter the email address you would like to appear on your invoice/packing sheet. |
| Company Phone | Enter the company phone number you would like to appear on your invoice/packing sheet. |
| Invoice Template | Enter the invoice template you would like to use for your invoice/pacing sheet. Note: You can upload/download invoice/packing sheet templates under the Settings > Print Templates menu option from the left hand menu. |
| Name Translation | Enable this option to add the local inventory item name to the invoice/packing sheet as well as the sales channel name. (This option is very useful if your item names differ across your sales channels or if you're selling on international sales channels.) |
| Despatch Email Active | Enable this option to send an email to the customer (with tracking data if applicable) when the order is despatched. Note: Do not activate for any Amazon sales channels. |
| Email Subject | Enter the email subject how you would like it to appear to the recipient. |
| Email From | Enter the company name that you would like the recipient to see on emails. |
| Email Address | Enter the email address that you would like the recipient to receive sent emails from. |
| Email Template | Select the template you would like to use for emails sent. Note: You can create/edit email templates under the Settings > Email Templates menu option from the left hand menu. |
Step 12
Save the data you have input using the Save Changes button at the bottom of the page. You will see a green dialog at the top of the page to confirm the settings have been successfully saved (as below).
Step 13
Your new CubeCart 5 store is now integrated with Despatch Cloud and Despatch Cloud will now attempt to collect your despatch ready orders from your integrated CubeCart 5 store. This is an automated process and runs every 30 minutes on the hour and half hour.
When you despatch an order with Despatch Cloud, Despatch Cloud will automatically update your new CubeCart 4 store with the despatch data. Again this is an automated process and runs every 3 minutes, however requests are queued so at busy times this can take longer. You can view your request queue at any time under the Status > Request Queue menu option from the left hand menu.
If you would like support setting up this CubeCart 5 store with Despatch Cloud you can call us on 01377 538 010 or email [email protected].
CubeCart 6
Note: To setup a CubeCart 6 store with Despatch Cloud you must have the admin login credentials for the CubeCart 6 store you wish to setup.
Login to your Despatch Cloud account.
Step 2
Click on the Settings > Sales Channels menu option from the left hand menu (as below).

Click on Install Channel (top right) and select CubeCart 6 from the sales channels dropdown menu. Input a name for the CubeCart 6 store you are adding (example: CubeCart 6 or the name of the CubeCart 6 store) and click on the Install Channel button (as below).

Step 4
You will see the new CubeCart 6 sales channel auto install and a number of data fields will now show under the new channel. In order to activate this channel it needs to be connected to your CubeCart 6 store. You will see two data fields for API Key and URL that you need to obtain from your CubeCart 6 store.
Step 5
To obtain your credentials from your CubeCart 6 store you will first need to install the Despatch Cloud CubeCart 6 module. This module allows Despatch Cloud to communicate with your CubeCart 6 store.
To install the CubeCart 6 Despatch Cloud module click on the link below to go to the CubeCart extensions marketplace and click on the Auto Install/Upgrade Token link. You will see a popup window with an install token displayed, copy the install token to your clipboard (as below),
https://www.cubecart.com/extensions/shipping-methods/despatch-cloud-multichannel-order-stock-management-cubecart-5/6


Step 6
Login to your CubeCart 6 store and from the left hand menu select "Plugins>Manage Plugins". You will then see the token auto install box. Enter the install token and press the "Go" button (as below).
Step 7
You will then see the new Despatch Cloud module in the module list. Click on the "Edit" link to setup the module (as below).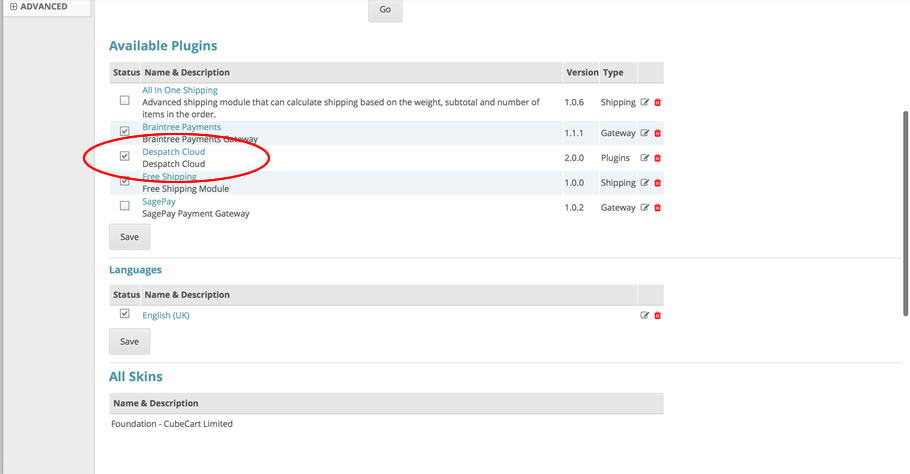
Step 8
Set the status to "Enabled".
Set an API key. This key can be anything however we suggest you create a random password and enter this in the API key field, the key needs to be at least 24 characters long and be made up of random letters, numbers and symbols.
Note: You can use a service such as http://passwordsgenerator.net/ to create a secure random API key.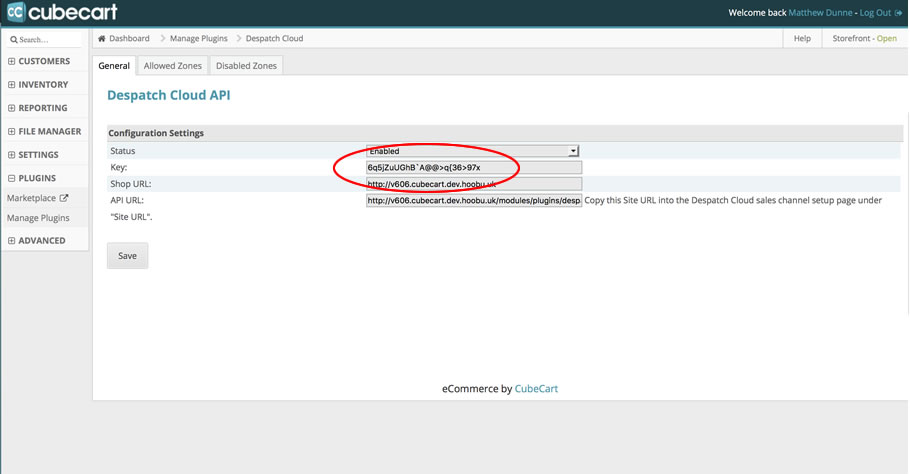
Step 9
Save the changes using the "Save" button (as below).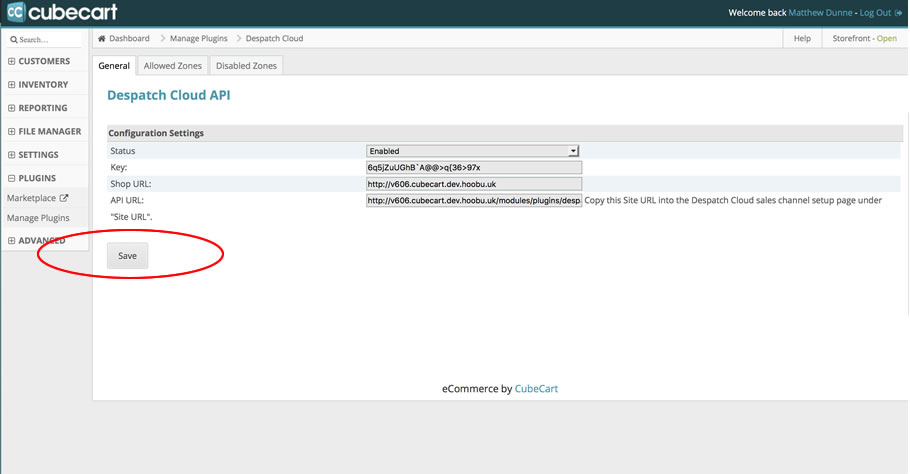
Step 10
Copy the API Key and Shop URL into your Despatch Cloud account under the new CubeCart 6 store you installed in Step 4 (as below).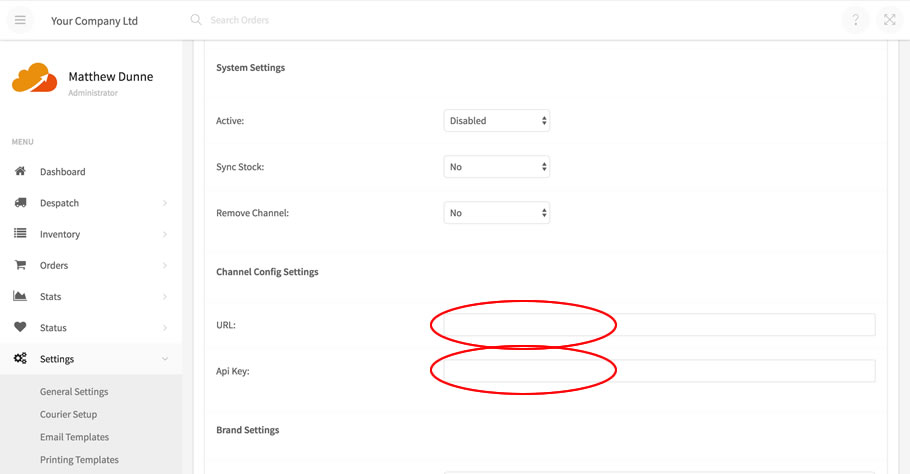
Now your CubeCart 6 authentication credentialsare inputted into Despatch Cloud the last step is to fill out the remaining data fields for the new CubeCart 6 store.
These fields are as follows:
| Field | Description |
| Active | Enable this option to activate this sales channel. |
| Sync Stock | Enable this option to synchronise stock for this channel |
| Remove Channel: | Use this option to remove the sales channel (you will not want to do this if you are currently adding it, however it worth knowing how to remove a sales channel). Note: To use this option select Yes from the dropdown, then click the Save Changes button at the bottom of the page. The Sales Channel will then be removed, however orders from this channel will NOT be. |
| Company Logo | Select the image you would like to appear on your invoice/packing sheet. |
| Company Name | Enter the company name you would like to appear on your invoice/packing sheet. |
| Company Return Address | Enter the return address you would like to appear on your invoice/packing sheet. |
| Company Reg Info | Enter the company registration number you would like to appear on your invoice/packing sheet. |
| Company Email | Enter the email address you would like to appear on your invoice/packing sheet. |
| Company Phone | Enter the company phone number you would like to appear on your invoice/packing sheet. |
| Invoice Template | Enter the invoice template you would like to use for your invoice/pacing sheet. Note: You can upload/download invoice/packing sheet templates under the Settings > Print Templates menu option from the left hand menu. |
| Name Translation | Enable this option to add the local inventory item name to the invoice/packing sheet as well as the sales channel name. (This option is very useful if your item names differ across your sales channels or if you're selling on international sales channels.) |
| Despatch Email Active | Enable this option to send an email to the customer (with tracking data if applicable) when the order is despatched. Note: Do not activate for any Amazon sales channels. |
| Email Subject | Enter the email subject how you would like it to appear to the recipient. |
| Email From | Enter the company name that you would like the recipient to see on emails. |
| Email Address | Enter the email address that you would like the recipient to receive sent emails from. |
| Email Template | Select the template you would like to use for emails sent. Note: You can create/edit email templates under the Settings > Email Templates menu option from the left hand menu. |
Step 12
Save the data you have input using the Save Changes button at the bottom of the page. You will see a green dialog at the top of the page to confirm the settings have been successfully saved (as below).

Step 13
Your new CubeCart 6 store is now integrated with Despatch Cloud and Despatch Cloud will now attempt to collect your despatch ready orders from your integrated CubeCart 6 store. This is an automated process and runs every 30 minutes on the hour and half hour.